Showing posts with label fishing tips. Show all posts

Tuesday, April 18, 2017

Tuesday Tips - Ask The Experts


Floating Line or Sinking Tip for Streamers?

Written by: Phil Monahan
This Battenkill brown fell for a sparse marabou streamer fished on a floating line with no weight on the leader.
Photo by Phil Monahan

Joe Demalderis, Cross Current Guide Service (Milford, Pennsylvania): With streamers, I’m often banging the banks from a drift boat when the water is higher than normal and/or dirtied up. If it’s significantly higher, I’ll use a sinking tip, if not too high, a floating line is fine. Either way, the Bank Shot line is made to order for this. There are also occasions when the water isn’t that high, but for softness of presentation I want a unweighted fly. Under those conditions, a sinking tip with fluorocarbon leader is the ticket.
When swinging wet flies, I prefer to use one bigger/heavier fly and a dropper that is smaller and softer. I try to avoid adding weight to the leader and prefer to get flies deeper by mending and using a longer tippet section that will get down quicker. The heavy fly is my edible weight, and the dropper is my fly du jour or hatch-matcher.
There are times of high water with extra swift currents when I’ll add some sink putty to the leader instead of shot. The putty gets hung up less, casts nicer, and if it does hang up you can usually save your flies and just lose the putty. Sinking tips come into play for me when the water is too deep to effectively get to fish level, but even then, a change of angle with a floating line and proper mending should get me where I want to be most often. Mending is the key when swinging wets and a floating line mends easier and keeps me in contact with my flies better.

Jenny Mayrell-Woodruff, Woodruff, Flyfish Beaver’s Bend (Broken Bow, Oklahoma): I use a floating line with split shot more often because I am constantly changing locations on the river. I like the flexibility of managing the depth with split shot, as well as removing the split shot if I need to switch up the method of presentation (dry fly, double dropper rig, etc.). I use sinking lines when my plan is to solely throw streamers in deeper water for the whole day.

John Herzer, Blackfoot River Outfitters (Missoula, Montana): Around Missoula, we primarily fish from boats, so we rarely use full-sinking lines or even sinking tips longer than ten feet when fishing streamers. Problem is, you need to get your flies in and out of the water quickly. With an integrated sinking tip or full-sinking line, you need to continue to strip the line all the way in before you can recast. In order to get the proper depth, we lengthen our leaders and fish weighted flies. if that’s not enough, add split shot a couple inches in front of the fly. If we’re really going deep, we slip a worm weight (that’s right, like bass fisherman use) on the leader before we tie on the bug. In both instances, the weight will give the fly a jigging action, which the trout find very attractive.
There’s more than one way to skin a cat: anglers can choose among (l to r) a regular integrated sinking-tip line, a line designed for heavy flies, or a sinking tip that attaches to the end of a floating line via a loop-to-loop connection.
 
Chuck Hawkins, Hawkins Outfitters (Traverse City, Michigan)I always use sinking tips when streamer fishing. Depending on water conditions, I use 200- to 350-grain sinking tips in my everyday trout, steelhead, salmon, and smallmouth fishing. There are several reasons: a sinking tip gets the fly deeper, I can fish much shorter leaders, they allow for greater accuracy than fishing a longer leader on a floating line, and it’s easier to throw a sinking tip than it is to throw a heavily weighted fly with a floating line. I also find that novice fly anglers, with proper instruction, can handle a large streamer much easier when they have the weight of the sinking tip helping them deliver the fly.

Stefan Woodruff, Ellensburg Angler (Ellensburg, Washington): When I’m fishing streamers or wet flies, the decision whether to use a sinking-tip line or a floating line with split shot on the leader depends on the type of water I’m fishing. If it is a large bucket or run, a sinking-tip line is my go-to choice. Because a large portion of the line sinks, it keeps my flies “in the zone” and in front of the fish much longer. If I am fishing faster-paced pocket-water, where I need to get my flies sunk fast but don’t fish them for a very long time before picking up and making another cast, a long tapered fluorocarbon leader off a floating line is my best friend. I just add or subtract split shot to help get my flies down fast in smaller pockets of fishy water, like the soft water behind a large boulder. This setup also gives me the ability to “high-stick,” keeping line off the water and giving me maximum feel and control in water with complex currents.

Patrick Fulkrod, The South Holston River Company (Bristol, Virginia): I love swinging soft hackles. When I am fishing soft hackles and other traditional wet flies, I always prefer a floating line. The floating line will give me the ultimate in sensitivity to ensure I can detect the lightest of strikes. The lead / tungsten core of a sinking line dampens the sensitivity. If needed, I will add a small split shot to help fly get to to the right depth.
When using a fly that I will strip or retrieve, I always prefer a sinking tip or sinking line. Emulating the swimming action of many baitfish and other small fish requires the fly to be down deep, and a specialty sinking-tip line complements this method well.

Maggie Mae Stone, The Tackle Shop Outfitters (Ennis, Montana): When using wet flies and streamers, I always think about the depth of water I may be fishing and the speed of the current. For example, if I’m fishing still water, I almost always reach for a full-sinking line, as the depth is usually greater than a river or stream. It’s also less of a hassle for me to use rather than adding a bunch of split shot. When it comes to the river, if you’re fishing deeper buckets and faster currents, the weight of the sinking line will allow your wet flies to remain deeper and not float to the top as quickly as floating line would. If you find yourself without a sinking line and you know those fish are hanging out in deeper buckets (they’re not coming to the surface), then split shot works to get your floating line down quicker. I will add some split shot, and then adjust accordingly. If I’m dragging bottom and getting hung up, I will take some off. If you find yourself in shallow water, a floating line with no split shot will work well if the fish are hitting your streamer or wet fly. You can usually tell after a couple of casts if the fish are hitting streamers, as they will be very aggressive. To sum it up it’s all about depth and current speed.

Tim Linehan, Linehan Outfitting Company (Troy, Montana): When fishing streamers and wet flies, I let the situation, mostly water depth and current speed, dictate whether I use a floating or sinking line. If I’m concentrating on the top six inches the water column in walking-speed current or slower, I’ll generally stick with a floating line. If I want to penetrate the water column and cover the first two feet, I’ll add split shot accordingly. If I really want to get down and penetrate the lower half of the run, whether it be four feet or ten feet, I generally use a sinking tip. And to that end, I will also adjust the weight of the sink tip to accommodate the current speed–obviously using a heavier grain for faster current and bigger water.

Jeff Davis, All Water Guides (Austin, Texas): This is a great question and one that comes up often. There are multiple factors, which determine when we have our client’s use sink tip lines or use floating lines.
First, let me discuss our “go-to” setups. For the purpose of this discussion we are addressing fishing for Texas river bass (largemouth and guadalupe bass) with 6-weight and 7-weight fly rods in rivers that are rarely more than 10 feet deep. Our boat rods are rigged as follows: We usually have four rods rigged and ready—2 rods rigged with floating line and 2 rods rigged with a sinking-tip line. Personally, my boat roads are Orvis Recons because they are great casting, user friendly, and incredibly durable, holding up to long rides in the rod holders and hundreds of days on the water. We all use Orvis lines, ranging from Hydros to Access and everything in between.
We let the following factors determine our set-ups: water temperature, time of year, time of day,  water clarity, and water flow (CFS). By dividing the river into three sections—upper, mid, and deep—we can create the best set up to address all the above factors and ever-changing conditions that we encounter on any given day on the river.
Upper-water Column: We usually we will prospect with a floating line and an 8-foot fluorocarbon leader. Even during winter months we will prospect with patterns that work the upper water columns—from the surface down to that first 12 inches of water.
Mid-water Column: Before switching to a sinking tip, we will try a floating line with 9-foot fluorocarbon leader and a weighted (barbell-eyes) streamer pattern. We will concentrate on depths between 12 and 36 inches, working the fly fast, then medium speed, and finally with a slow retrieval rate.
Deep-water Column: The dog-days of summer and winter’s coldest days are when we concentrate on the deepest water close to thick cover. This is when sinking-tip lines are at their best. They cast much easier than full-sinking lines and thus, they are more forgiving to novice anglers. Our go-to set up is usually a 6-weight rod with a 4-foot fluorocarbon leader with an unweighted diver or streamer pattern or a 7-weight rod with a 4-foot fluorocarbon leader with a weighted (barbell-eyes) crawfish pattern (e.g., Ghetto Craw) with a mono weed guard fished with a slow retrieval rate as deep as possible and right next to the heaviest cover.
Rarely, we use floating lines with split-shot when using streamers. Instead we carry a wide variety and weighted streamers. Sometimes in a pinch we will add split shot but find that the patterns work best without using split shot.

Tuesday, March 28, 2017

Tuesday Tips - Ask The Experts

Ask the Experts: How Do You Set Your Drag Before Fishing?

Written by: Phil Monahan
The right drag setting can be the difference between a fish in the net and a “long-distance release.”
Photo by Chad Shmukler, Hatch Magazine

Patrick Fulkrod, The South Holston River Company (Bristol, Virginia):
A super loaded question considering circumstances and variables. On an initial evaluation of my drag setting, I will always fish with it set a little on the lighter side: loose enough, but not so it will backlash. If or when I hook a good fish, I will tighten as needed. I feel it is always easier (or more forgiving) in a situation to add more drag, rather than to lessen the drag.

Tim Linehan, Linehan Outfitting Co. (Troy, Montana):
The analogy I’ve always used when discussing how to set the drag on your reel is that it’s based on the same principle as the brakes on your car. The more you need the brakes, the more you apply. Simple as that. If you’re fishing a small trout stream with little or no chance of needing any brakes to slow down fish in order to better manage them, you don’t even need a reel with drag.  But as you move up the species list in size and weight, drag becomes very important and absolutely necessary. Generally you can also base the need for drag on rod weight. If you’re fishing rod weights of 1-4, you’re likely not really fishing for monster fish that will require the use of drag.  As you start heading upwards of 5-weights, drag will come into play.
So, how best to set the drag? Regardless of what species you may be targeting, you want to set the drag to accommodate the particular behavior, size, and weight of that species. Taking that into account, the standard way to check and properly set the drag is to assess approximately how much resistance you believe is necessary to let the fish run, so as to apply the brakes and also to prevent the spool from over running and creating a mess. This is a dance, and it’s often learned from trial and error. Too much drag and the fish will break off; too little and, well, you’ll lose the fish for other reasons.
When you’re ready to actually set the drag, simply judge how much resistance you want to start with by pulling line off the reel with the drag set to your liking. And keep in mind, there is always time to tighten the drag during the fight with bigger fish, especially salt water species. In the end, if you break a fish off because the drag was too tight, loosen it. If you break a fish off because the spool over ran, tighten it.

Brown Hobson, Brown Trout Fly Fishing (Asheville, North Carolina):
I’d rather have it too loose than too tight, but I don’t want it so loose that when the reel engages I get a backlash. I like to tighten the drag once the trout puts himself on the reel. I know if I can survive the first run of a big fish, I’m probably going to land him, so the worst thing I can do is break him off because initially my drag is too tight.
My plan is always to fight the trout by stripping with my line hand, and the drag is purely a back up. Sometimes when I’m fishing with a light tippet in an area dense with large trout, I will plan on using the reel because the drag is better able to dampen tippet pressure than I can and I will have to clear less line off the water. Really there is no substitute for experience when adjusting drag on a fish. Unfortunately new anglers will just have to break some off while learning how much pressure their rod/line combo will allow them to apply.
I’ll repeat the most important thing in my opinion: If you survive the first run, you will likely win the battle. Most of the big fish my clients lose break off in the first 5 to 10 seconds. The trout is too unpredictable at that point. Just keep him hooked until he settles down, and then increase drag/pressure whenever he is not kicking his tail or shaking his head.

Joe Demalderis, Cross Current Guide Service (Milford, Pennsylvania):
One of the mysteries of the Universe is how much to set the drag on a fly reel, and the answer is: it depends. So the mystery lives on. But there is a solution to this, and whether right or wrong, it’s how I do it and it’s worked out okay for a long time. Basically, just tighten the drag so it doesn’t backlash if you give the line a fast, long pull with your hand.
But, there must be more to it than that? Yes, there is. Add in the tippet strength, rod weight, rod action, hook size, fish species, and water conditions, and you will find some adjustments might be needed.
For many freshwater fish, the backlash rule works fine, but others like salmon, steelhead, giant carp, stripers, big pike, and muskies require a tighter drag. Your tippet strength will help you there. A 30-pound leader for pike or muskie will allow for a higher setting, and the same is true for freshwater stripers. Leader-shy salmon or steelhead need lighter tippets, so there you want the drag on the light side to keep that often blistering first run form breaking you off.
Remember, your fly line is pretty thick stuff, and as it zips through the water, it actually creates its own drag. How much you bend the rod, the rod action, and the angle you hold the rod also puts varying amounts of drag on your set up. I like to use these dynamics in playing or fighting a fish and not depend too much on the mechanical drag. A quick change in angle or rod height can put less or more pressure on a fish. Things happen fast, and a change of rod angle and the like can be made very quickly if needed. Then there’s palming the reel to add more drag on a drag set too loose.
Confused? Don’t be. Set the drag at that pre-backlash level. Go fishing. If you hook a big fish that needs more drag to quickly land before it fights itself to death, then tighten the drag knob a wee bit, or loosen it some if that was the direction we needed. Some people will tell you to never touch the drag when you have a fish on. Not so. There’s no such thing as never in fly fishing.

Mike Canady, Ellensburg Angler (Ellensburg, Washington):
How you set your drag on your fly reel depends on the species you are targeting, as well as the technique you are using. When fishing for trout with small flies and 5X or 6X, I generally set my drag as light as possible to protect the light tippet from breaking if the fish makes a big run. Likewise, when fishing big flies and heavy tippet, especially around brush or snags in the water, I will set my drag to “stun” (as tight as possible) to keep a hooked fish from making a beeline to the nasty stuff and breaking off.

Capt. Chuck Hawkins, Hawkins Outfitters (Traverse City, Michigan):
This is a complicated question. It depends on the species you are pursuing, the location, hook size, and tippet strength. For saltwater species, I use Lefty’s method: Pull the line off the reel with your lips only. When you can’t get anymore off, it’s set to the right pressure.
For stream trout on dry flies, I set the drag very light, just enough to control the spool. Same setting for streamers and trout. For the Hex hatch–big fish on size 6 and 8 hooks combined with fishing in the dark–I tighten the drag down. I don’t want that fish making any long runs in the dark in a log-strewn river.
Swinging for steelhead, I use a very light setting to keep my clients from pulling the fly out of the fish’s mouth w\hen they get a grab. When the fish takes the fly and the client feels it, often they raise the rod. If they do that with a very light drag, the fly stays in the fish. I can then tighten the drag for the fight.
In general, I lean toward a very light drag setting until I’m hooked up, and then tighten it down if needed to quickly land a large fish.

Capt. Dave Pecci, Obsession Charters (Charlotte Harbor, Florida):
Rule of thumb on my boat is to set the drag for 30% – 40% of the class tippet. That allows for startup inertia and any surging of the reel’s drag system that might take place. But you must consider the species you are fishing for. Snook and redfish fight in short bursts and like to move into the mangroves after being hooked. They need a bit more drag. Rockets like tarpon and bonefish need a slightly lighter setting due to the drag of the line moving through the water on blistering long runs. I always encourage my clients to go with a lighter drag setting and palm the reel (if they are comfortable doing so) when additional pressure is needed, such as turning or lifting a fish.

Rob Woodruff, Woodruff Guide Service (Quitman, Texas):
I set my drag based on the breaking strength of the tippet I am using. When fishing for bass or trout, I set up the entire rig and then pull on the fly to make sure that the drag will let out line at less than the breaking strength of the tippet. I always go with a little less drag tension than the breaking strength to make up for the effect of water drag on the line and leader.
When fishing saltwater for big fish that I expect to have a sustained fight, like tarpon, I use a scale (a Boga Grip or hand held luggage scale works fine) to set the drag at less poundage than the tippet breaking strength.

Doc Thompson, High Country Anglers (Ute Park, New Mexico):
Basically, the drag is used to help fight or tame the fish without breaking off and without fighting the fish beyond exhaustion. With that said, drag settings can range from light to cranked down depending on fish species, tippet, type of water, action of rod, etc.
When I guide and fish for trout, I like the drag setting to be a few clicks tighter than free spooling.  This keeps the line from backlashing when I’m stripping out more line. On the other hand, when I fish for permit and other saltwater species, I use a considerably tighter drag setting. At a certain point, it does become a balance between too heavy, causing a break off, or too light, causing extreme fish exhaustion.
I have found most people set the drag too light for a couple reasons.  One is they’re afraid to break off a fish, when breaking of a fish every once in a while is a fact of fishing. The other reason is they like to hear the reel scream with a running fish, but if it’s running because the drag is too light then we are adding unneeded stress to landing a fish.
Finding the exact drag setting is trial-and-error, but you can help yourself and the fish out by testing your drag.  A simple way to test the drag before you fish is to quickly strip out a couple feet of fly line with 2-3  strips. This will give you a general idea of the current drag setting. After that adjust and retest accordingly. Sometimes we have to adjust the drag during the fight; just be sure to do this smoothly with incremental adjustments.

Kip Vieth, Wildwood Float Trips (Monticello, Minnesota):
I have had 48-inch muskies that didn’t put much of a fight at all and never did get it on  the reel, and I have had 40-inch muskies that fought with a wildness of a fresh-run steelhead. A lot of it depends on the fish and what kind of mood they’re in. As a rule, I usually start with the drag probably on the lighter side. I find it easier to ratchet it down a bit, rather than risk losing a fish of a lifetime on a tight drag. Err on the side of caution.

Tuesday, March 21, 2017

Tuesday Tips - Ask The Experts

This one is from the Orvis website:

Ask the Experts: What is the Most Common Fly-Fishing Mistake?

Written by: Phil Monahan
Knowing how to cast is important, but so is knowing when to stop casting and start fishing.
Photo by Sandy Hays

Tim Linehan, Linehan Outfitting Co. (Troy, Montana):
The single most common mistake clients make? Clients make too many false casts.  You can’t refute the fact that fish are caught with flies in the water. If you have an angler in the front of the boat who makes one false cast and puts the fly right back on the water, and the angler in the back of the boat makes two false casts every time, theoretically and all things being equal, the angler in the front of the boat will have his fly on the water twice as much throughout the day. You could reasonably assume that will translate into more strikes.
The remedy for overzealous false casting is simple. As a guide, I keep a Taser gun right next to me. If a guest makes more than one false cast, I let them have it. Generally it only takes a shot or two and the problem is solved. This method is tried and true. But keep in mind if you’re a guide and decide to employ the Taser method, be sure to have your feet planted firmly on the rubber mat each time you let it rip. One time, the bottom of the boat was wet, and I gave the guy in the front of the boat a good jolt. Seems the current traveled the length of the boat and hit me and the guy in the back. Later that day, one of my guides wondered why he saw the three of us slumped over and floating downstream with a fog of smoke surrounding the boat. I told him it was the Hibatchi.

Joe Demalderis, Cross Current Guide Service (Milford, Pennsylvania):
A very common error I see is when a dry-fly angler makes a cast that is close (e.g. short), but not close enough, and then rips the fly off the water to make another cast. Almost always, this results in the fish being spooked. Instead of ripping your fly off the water, let it float by the fish and only then pick it up. Now you can make another cast to the same fish that’s clueless as to what’s going on.

Mike Canady, Ellensburg Angler (Ellensburg, Washington):
I think one of the biggest mistakes that guests make isn’t really a mistake in the way they fish or any technical aspects. Instead, it is the guests not being up-front and honest with their guide. Every morning, I ask my guests what their goals are for the trip, what they believe their skill level is, and if there are any techniques they want to get better at–such as how to mend better, or how to throw tighter loops, or even read water.
Too many times, we hear our guests say that they are very good casters and they just want to put a bunch of fish in the boat. That is a fine goal, and I will definitely try my hardest to accomplish it. However, I think that you can get so much more from your guided trip if you just be honest with your guide in the morning and say, “Hey I have only been fishing for X amount of years, I really want to catch some fish, but I would also like to learn how to do X better during the guide trip.”
The way that I look at it is that you are paying good money and spending your valuable time when hiring a guide, so you might as well get all you can out of the day. I always feel that if I can help a guest become a better angler in some way during their time out with me and they can go out later and put that knowledge to use the next time they go fishing, then I have done my job.

Capt. Chuck Hawkins, Hawkins Outfitters (Traverse City, Michigan):
Streamer fishing: Angler recast to the same area immediately after making a cast that fell a foot short.
Dry-fly fishing: Anglers don’t control the line to eliminate drag and don’t cast to the lane where the fish rose–meaning they don’t properly mark a rising fishes location
Nymphing: Anglers take their eye off the indicator.
Overall: Anglers don’t work to continually improve their casting.

Capt. Dave Pecci, Obsession Charters (Charlotte Harbor, Florida):
The most common thing I run into as a saltwater guide is inadequate casting. Most anglers have trouble casting in windy conditions and achieving the necessary distance.
You can avoid casting issues by working with a casting instructor and practicing prior to your trip. If you don’t have your own equipment, go to a fly shop and try out demo rods with a store associate. If you do that, the responsibility for a fun and successful fishing trip falls on me as your guide.

Capt. Lucas Bissett, Low Tide Fly Fishing Guide (Slidell, Louisiana):
Lack of preparation prior to the trip. Many customers come onto my boat without having picked up a fly rod since their last trip.

Doc Thompson, High Country Anglers (Ute Park, New Mexico):
There are a few reoccurring things I see on the water. One of the biggest is anglers spooking fish.  This comes in many forms, from crashing casts to noisy wading to dragging drifts, etc. Narrowing it down, I would say on the smaller rivers and streams it is spooking fish from noisy or fast wading practices, when the actual wading spooks fish one or two pools up. I often remind people that it doesn’t matter how great a cast or drift you make; if the trout already knows you’re there, it won’t eat. The easiest way to solve this is to slow down and move along or through the water slowly and quietly.

Kip Vieth, Wildwood Float Trips (Monticello, Minnesota):
This is perhaps the easiest question we’ve been asked so far. It’s all about casting, when it really come down to it. We have a big fall get-together called Musky Camp. Fellow guides and friends gather for four or five days of musky fishing. This is one of the rare times that I get to fish each year.
I was in the bow of the boat, my son was in the back, and my good friend Jon was on the sticks.  We drifted down the river throwing chicken flies. I was really struggling with my cast. My son barked at me from the back,  “Dude your casting sucks.” Well, it did. As I sat there pouting, it dawned on me: Hey I don’t fish much anymore, so how can I really be as good at it as I once was? The moral of the story is that no matter how long you’ve been fly fishing, you still need to practice. Let’s be honest: we’re not as good as we think we are. It took a smart-mouth 15-year-old boy to prove the point to me.

Maggie Mae Stone, The Tackle Shop Outfitters (Ennis, Montana):
Fly fishing is one of those sports where you are constantly learning each time you’re out.  As a counselor and guide, I find mistakes to be things that will help you to learn and grow. Here are the three most common mistakes that get us learning when out with a novice angler.
Strong knots: I get many clients who want to learn to tie on their own flies, which is so great! We usually start with an improved clinch knot, which can be used for just about any size and type of fly. The angler will learn very quickly if that knot is tied well; the first time you lose a fish to a poorly tied knot, you’ll find yourself becoming a knot tying expert!
Fly Choice: Many clients (especially kiddos) want to dig through my fly boxes and pick their own flies. Most want to put on something pleasing to the eye, like a big flashy streamer.  A quick entomology lesson about what is hatching or how trout are selective feeders usually lets the client know we need to switch up our fly to match the hatch.
Good presentation: My saying in my boat is “You can’t catch fish in the air!” Some novice anglers think you need to be a great caster to catch fish. This is not true. We work on a natural presentation and keeping that fly in or on the water as much as possible. Once they understand that we’re trying to imitate a certain bug and provide the most realistic drift possible, they find themselves getting into fish.

Capt. Tony Biski, Monomoy Fly Fishing (Harwichport, Massachusetts):
Too often, anglers cast to the same spot over and over. I telll them to fan their casts to cover more water.
Stefan Woodruff, a href=”http://ellensburgangler.com/” target=”_blank”>Ellensburg Angler (Ellensburg, Washington):
One of the biggest mistakes I see clients make in my boat is not letting their flies fish. As much fun as casting a fly rod is, most fish are caught in the water, not in the air! Maximizing the amount of time the fly is in the zone–especially when dead-drifting dry flies or nymph rigs–means mending effectively and efficiently to achieve the longest drift possible, which will in turn show your flies to more fish. Unless your only goal is to look like Brad Pitt in “The Movie.” Then, by all means, cast away!

Tuesday, March 14, 2017

Tuesday Tips - A Few Ways Not To Break Your Rod

Whether we like it or not, we're going to have the odd accident here and there. Car doors, falling, you name it, there are lots of accidental ways to break your fly rod. 
As blank technology has improved (to increase performance) the sidewall thickness in rod blanks has gotten thinner and impact resistance has dropped.

But there are a few things you can do/not do to decrease the chance of breakage.
Keep your hand off the blank when playing fish

1- Don't play fish with your hand riding up the butt section. 
One of the top ways that rods are broken. People try and get more leverage by putting their hand up the butt section. This affects ferrule flex angles and will invariably lead to breaks at the ferrule. If you keep your hand on the cork, and use proper rod 
angles, you'll fight fish way more efficiently.

2- Don't shock the rod when snagged on something.
If you you get snagged on something like a tree, don't repeatedly jerk the rod back. Graphite can take a huge amount of bend and stored energy, but when it is shock loaded repeatedly it will often fail and then you have a broken rod.
If you aren't able to reel in line and go retrieve your fly by hand then point the rod tip at the snagged fly, hold the fly line at handle, and gently pull until it pulls free or tippet breaks. Make sure to leave at least 4 or 5 feet between rod tip and snag, otherwise the fly can snap back and hit the rod tip. This may lead to a tip breakage.If you lose a fly doing it this way its way better than busting a rod.
Right way
Wrong way when snagged


Wrong way
3- Keep the rod angle in front of you when playing fish.
Still continually see people playing fish just like the angler on the
old Orvis logos. This is not great for couple of reasons. First, and
relevant here, is it will often lead to rod breakage. As soon as the
rod butt gets back around your cheek and ear the risk of
breakage increases greatly. As soon as butt gets behind your ear
you're going to break the rod. Maybe not today but it's going to

happen.The other reason to shallow the angle of your rod when playing fish is that you are WAY MORE efficient. If you keep the tip way up you play fish with the tip (you can't lift a pop can with the tip) If you shallow the angle you play the fish with the butt of the rod. (you can exert a LOT of force with the butt of the rod).
By using a shallower angle and always applying pressure opposite to the direction the fish is swimming you will land fish quicker, land bigger fish, be easier on the fish, and break fewer rods. Win, win, win, and win.

4- Don't set the rod around doors and tailgates.
You've heard this one a lot! But you still do it. Lean a rod 
against the vehicle around open doors and tailgates while you
get gear on or off. Something is going to happen and a rod will
get broken. In a perfect world we put our rod away in a tube or 
set it up last but we don't live in a perfect world.
So, the safest, foolproof way to store the rod around a vehicle is
to put it on the windshield, under the wiper, like the photo 
shows. This will keep the rod safe from doors, wind can't blow it
over, and you can't drive away and forget it.

Tuesday, March 7, 2017

Tuesdays Tips - Getting the Boat and Trailer Ready This Spring


Even though there's likely to be a bunch more winter before it's done, before you know it spring will arrive. Sometime in the next couple of months you'll want to get the boat ready for next summer's float trips. Here is list of what to go through when getting your boat ready as well as some ideas for how to keep it in better shape for down the road. We are assuming that the boat is stored outside. If yours is not then some of these are not applicable.


Checklist for getting the rig ready:

1) Remove your cover. As soon as weather permits you should completely wash the winter grime off of your cover and let it sun dry. Best is to hang the cover on your fence when washing and drying.

2) check your trailer hitch. Make sure that hitch is clean and lock assembly moves freely from the lock to unlock position. Grease the hitch (best way is to sit until you tow it first time. put grease on trailer ball and then hook up trailer.)

3) Check tire pressures, including spare. If a trailer has sat over winter the tire pressure is likely low.

4) Check condition of tires and tread. Now is the time to find out you need new tires and get them, not on the road to Carseland. Tread should be 9/32 depth on tread with no cupping (uneven wear patterns). **if you notice cracks on the side of your tires this is called weather checking. It is caused by too low of tire pressure and extreme temperature variation like you see in the winter. On a trailer tire, this likely won't lead to failure but keep an eye on them that it doesn't get a lot worse. Next year make sure the tire pressure is up before you store it.
**if you are getting strange, uneven, or premature wear on your trailer tires the likely culprit is the axle and/or alignment. Standen's in Calgary can fix you up .

5) Make sure hubs are greased. This should be done after every three or four uses through the season. If you don't have Bearing Buddies, get them. Hand greasing bearings really sucks. At this time, make sure there isn't any grease on the back side (axle side) of the hub in quantity. If there is it means you have a seal failure and it should be replaced.


6) Hook up to vehicle and check all lights. **This is the time to get them all working. Now is the time to get that grease in the trailer hitch as well. And while you're at it, check to make sure you're trailer hitch is adjusted properly. With the trailer hitched up, lift up on the trailer, if there is any movement of the trailer hitch on the ball (you'll feel it and hear the clunk) then you need to adjust the hitch.

7) Since you're hooked up, make sure that trailer rollers are in good shape. Also, check your trailer bunks. Over time the carpet material wears out on the bunks. Now is the time to take care of that. Running for a season with a bad bunk or roller can severely damage the bottom of your boat

8) Check your anchor rope. They do wear out over time. Make sure that your anchor release works properly and the connection assembly (clevis) on your anchor works ok. Nothing worse than getting to a boat launch first time of the year and you can't get your anchor installed.

9) Check storage and seat storage. Now is the perfect time to get organized. And also a great time to find that junk you left under a seat last October and get rid of it.

10) Check seat operation and seat pads. Make sure they swivel like they're supposed to. Check seat pads for cracks or wear. A little trick to keep your seat pads lasting longer is to clean them and then spray with 303 protectant (available at Canadian Tire). Do this in the spring and your seats will stay way nicer. If you do have a crack in a seat pad the best way to address it is to put Aquaseal on the crack or tear. This will delay having to replace for a season or two.
And if you used the 303 to start they likely wouldn't have cracked.

11) Check any trim (black edge trim on Clackacraft gunnels, rubber trim on boxes and gunnels on Hyde, etc.) Some of these items become loose or worn over time. Half an hour with some contact cement will keep your boat in a lot better condition when it come to edge trim, etc.

12) Once all of this is done it's time to wash the boat completely. The place to do this is at a car wash. The high pressure wands are the very best way to clean a boat. Kick the boat off the trailer just enough so that water will drain (rear drain holes). Completely spray clean inside of boat and then do outside. If you have built up dirt or staining, use a product called Spray Nine. Just spray it on the area, scrub with a brush, and then high pressure wash. Makes it look like new.
For the outside of boats that have the "scum line stain", you can use another product, called Black Streak Remover. It is sold at RV dealerships and is used on fibreglass sided RVs. Works great on boats.
**To keep your boat clean and not get staining and those scum stains on the outside is really easy. Power wash your boat inside and out after every use. That night, not the next day. Also, if you use car wax on the outside of the boat when you do the spring cleaning (after you wash it) the scum washes off easier.

NOW GO FISHING!


Tuesday, February 28, 2017

Tuesdays Tips - Picking Your Target


Time and again I see clients who are, at very least, decent casters bonk fish right on the noggin. One of the biggest reasons (I think) for this is where we focus our eyes. Once a fish is spotted, the anglers recognizes direction of movement, distance, etc. anglers should focus on where the fly should land, not solely the fish.
If their eye is focused on the fish then that's what they're going to hit. Focus on where the fly should land and make the cast! (this is that split second where that couple hours worth of practice before the trip goes a long way).


So, that's fine and dandy, but where in tarnation should one put the fly? Well, as it was put to me a long time ago "you might start by throwing at the end that eats"
After that you might want to get a tad more technical, but not much. To present the fly to Tarpon, Bonefish, Permit, etc., there are a few things I think are a must.
**note: everything here is general, the nuances of migratory Tarpon fishing with regard to angles, etc. is much more complex. We'll save that for another day.
1-  I always want the fly in front of the fish. The fish swims into the fly.
2 - wherever possible I want the fly to cross the fishes direction of travel when it is retrieved.
The best way I have found (for me, and others seem to get it as well) to achieve these are to throw at a box, not at the fish.


To try and make sense for you, once you spot the fish, picture a 2 foot square box in front of the fish. (**this 2 foot box doesn't work for deep water, over 4 feet deep,  you need to increase the box size. This will get the fly deeper and to the fish) 
Always focus, and try to land the fly on the forward, far side corner of that box from the fish. If you do this, and the fly goes where you focus, the fly will be in the perfect spot. 
If you focus on the fish, you'll probably hit the fish.

Here are some examples to outline what we're talking about:


Crossing shot: fly line lands front, far side of box. Fish always sees fly. This shows left to right cross, for right to left same principle...far front of box.


Approaching Shot: fly lands forward corner of box, whichever side fish is traveling (fish going left, throw left corner, going right, right corner). **Even if a fish is coming straight at you throw to one side of the box. This will cross the fish with the fly. If you are right handed, throw to the left corner, opposite for left handed caster.


Going Away Shot: You're probably screwed, but you never know. Think of the box ahead and to the side of the fish. The fly should land in the farthest corner of the box from the fish and direction of travel. Drawings show both left to right and right to left scenarios. **If you take this shot, don't move the fly when it lands. Let the fish turn and react to the fly and then retrieve as appropriate. If you strip immediately you will likely spook the fish.
If the fish doesn't react to the fly then you chalk it up to a low percentage shot anyway and move on.

Tuesday, February 14, 2017

Tuesdays Tips - Playing Fish Close to the Boat/Skiff


When playing a fish, once you get it within about 40 feet of the boat, always stay on the front of the deck until the fish is landed. If you stay forward and the fish runs under the boat you can quickly and smoothly take the rod tip around the bow, following the fish to the other side.

This will also keep you in a better position and height to maximize angles of pressure at the end of the battle. It's way easier for your guide or fishing partner to subdue the fish if you're up and forward, not standing right next to him or her

If you step back into the center of the boat and a fish runs under and out the other side you're running a pretty high likelihood that you'll lose the fish or break your rod or both.

This applies for Tarpon, Bonefish, Permit, Jacks, etc.

Monday, February 6, 2017

How Fly Rods Break

This article is from Louis Cahill at Gink & Gasoline. You should give this a read!

Louis Cahill Photo

Broken fly rods are a fact of life, but there are things you can do to stop it from happening to you.

It happens to all of us. We all know the sinking feeling of holding that treasured favorite fly rod, shattered in our hands. Most of us can’t help but form emotional attachments to our gear. Favorite rods and reels become old friends, with whom we share memories of great days, special fish and life lessons learned. Warrantees are great, but it’s hard to replace an old friend.

I hear a lot of anglers complain about specific rods or rod brands, saying things like, “ I’ll never but another ‘Brand X’ after breaking two in a month.” It’s a delicate topic to address without hurting someone’s feelings, but the truth is, fly rods don’t break for no reason. While a high performance carbon fiber rod is certainly more fragile than its soulful fiberglass counterpart and a full spectrum between, the truth is that anglers break rods.

With extremely rare exception I have never seen a rod break for no apparent reason, even the ones I’ve broken my self.

If you are stewing over that statement, I ask you to bear with me for a bit and entertain the possibility that I’m right. Building and fishing bamboo rods for decades has taught me a thing or two about breaking rods and shedding tears. I’ve seen a lot of rods break and I even saw one catch fire and burn. (Long story.) In the interest of keeping those great fly rods fishing, I’ll share with you the most common reasons fly rods break and how to avoid them.


6 Reasons fly rods break

Physical Trauma
This covers some very obvious issues as well as some very tricky ones. With no scientific evidence I’ll say that the three most common causes for broken fly rods are ceiling fans, car doors and spurned spouses. If you’ve run afoul of any of these, you know it instantly. The remedy is simple. Be more careful handling your rod and you spouse.

PTs can be pretty sneaky though. A rod can be damaged without you even noticing and may not break for some time. Then one day you hook an unremarkable fish and it shatters dramatically. That was the case with the rod pictured in the header. This beloved Scott S4s was most likely damaged when it slipped out of the rod holder on a rough boat ride.

Some of the ways rods are most commonly physically damaged include being hit by flies during casting, being transported in cars or boots, being dropped and being left in hot rooftop rod lockers or rod tubes left in the sun. The latter is particularly tricky because a rod can begin to delaminate without showing any sign.

Of course, physical traumas can occur in manufacturing and shipping. I have found rods on my doorstep, still in the box, in more pieces than normal but while accidents happen, they are rare and manufacturing flaws are even rarer. I have visited the rod shops of many major brands and I can tell you the folks there take care and pride in their work.

Breaks at the ferrules
It’s pretty common for fly rods to break at the ferrules. The female ferrule can split and often the shaft will snap on the male end, either inside or near the ferrule. Frequently it will be the butt section of the rod that breaks, leaving the angler puzzled how the thickest part of the rod could just snap.

These breaks are not mysterious at all. The ferrule junctions receive more stress than any other part of the rod. They are stiffer, and therefore, more prone to stress. This is why one-piece rods are stronger than multi-piece rods. When a rod breaks at the ferrule, it is almost always because that ferrule has become loose. Either during casting or transporting, it has begun to unseat, causing the stress to be distributed unevenly.

Still photos of anglers casting show that a rod is frequently under more stress during casting than when fighting fish. If this force becomes focused on a specific spot by a loose ferrule, even the heaviest of rods can snap. You will likely not feel any difference in the rod when a ferrule is loose, so check them often, especially after transporting them.

High Sticking
High sticking is the most common reason rods are broken when fighting or landing fish. Not to be confused with the high sticking nymphing technique, high sticking when fighting fish refers to the angler applying an un-natural bend to the rod, over-stressing some part of the blank. This usually happens when landing a fish and results when the rod is lifted up, rather than back. The rod will often break in two places. Once in the tip or tip mid, and a second time farther down the rod as the pressure is unevenly released.

Supporting the rod
Another very common way for rods to break while fighting fish is when the angler uses a second hand to support the rod during the fight. It seems like a good idea to put a little extra pressure on the fish by supporting the rod farther up the shaft, but it’s a recipe for disaster. By taking the bend out of the butt section of the rod, you are forcing the stress farther up the blank, where it is not as strong.

Keep your hands on the cork during the fight and you’ll be fine. If your rod hand is getting tired or you just need a little extra leverage, try pressing down on the top of the reel seat or fighting butt. You’ll get just as much relief, while keeping your rod properly flexed.

Sudden Shocks
Fly rods are designed to be loaded smoothly. Sudden shocks can cause the delicate tips to shatter. This can easily happen when your fly catches something, like a tree or guide, in your backcast. I’ve also seen anglers do it willfully, trying to snatch a fly out of a tree. Never use your rod to clear a snag. Point the rod at the snag and pull the line.

Impact
This is really obvious, but rods break when they get whacked against things. Boats, trees, other fly rods, pretty much anything hard will do it. They are especially sensitive to being poked tip-wise into immovable objects. Be careful walking with your rod pointed forward. These kinds of breaks often happen while anglers are using the tip of the rod to dislodge a snagged fly. The sudden shift of a boat or loss of footing can invite disaster. Always expect the worst. Because these are physical traumas, the rod my not break right away, but later when casting or fighting fish.

Know your rod

While I do not know of any fly rod on the market, which I would say is poorly designed or manufactured making it more likely to break, certain types of rods are inherently stronger than others. Fiberglass rods, for example, are much stronger than graphite rods. Most graphite rods have some fiberglass in them to make them stronger. This strength, however, comes at a price.

Fiberglass is a heavier material than graphite. The more fiberglass in a rod blank, the slower the action will be. Many of today’s high performance, fast action rods have little to no fiberglass in their construction. This does not mean these rods are weak, but they are more prone to breaking when mishandled.

If you have been fishing the same fly rod for ten years and decided to upgrade to a new hot stick, you may have experienced this. A good friend of mine went through the same thing. He replaced an old Orvis rod with a brand new Helios-2, 7’ 9” 5wt. He broke two of them in short order. Is the Helios-2 a bad rod?

Hell no! It’s one of my favorites. I have four of them ranging from 4wt-11wt, and I fish them hard with no problems. I have learned from years of saltwater fly fishing for species like tarpon, how to use a fly rod under the most stressful circumstances. My buddy, who I love dearly and I’m sure is reading this, has a bad habit of high sticking fish, and he catches a lot of big fish. These days he’s much happier fishing a Superfine Glass rod. It’s the perfect tool for the way he fishes.

I hope this helps you keep your favorite fly rod in service for many years to come. When the worst happens, don’t cry. There’s a new love for you, right around the corner. 


Louis Cahill Gink & Gasoline  
www.ginkandgasoline.com


Monday, January 30, 2017

Assorted Fishing Tips - Bonefish in the Mangroves


So, you've made the cast of the month to a really nice Bonefish right in the middle of a mess of mangroves. The fish eats your fly, you strip set perfectly, and the fish proceeds to leave the country. As usual, the fish goes around as many mangrove roots as possible at somewhere around Mach 2.

What do you do? Most of us will just exert as much pressure as possible, trying to stop the Bonefish. Not going to happen...ever! Often the fish will go around enough roots, in enough different directions, until he just breaks off. 

When this happens next time try this:
1) immediately drop the rod tip

2) if the fish isn't on the reel yet let it go slack, if it is on the reel quickly strip off two or three pulls of line.

3) let the fish swim with no pull on the line. 

More often than not the Bonefish will immediately settle down and stop. This will allow you to move on foot, or position the skiff so that you can untangle your fly line from the mangrove roots and slowly reel in your line as you get closer to the fish. Once you get close to the fish you can resume pressure and maybe land the fish. Sometimes you may even have to repeat giving the fish slack a couple of times before you can land the fish.

Don't loosen your drag to try and accomplish this. First of all you can't mess with your drag near quick enough. Just quickly tug a couple arm lengths of line off the reel to give slack. If that isn't enough to get the fish to stop then it just wasn't meant to be. Second, if you kick the drag off and then the fish, or you, pull any line off quickly you're going to have a major birds nest on your reel.


This doesn't work every time. But it does work fairly often. It may mean having some chance where there was no chance before.

Friday, October 28, 2016

Tips and Tricks- Bonefish/Permit Leaders

It's getting to be the time of year when people are getting ready to go on their saltwater trips. 
Here's a couple suggestions for your leaders for 
Bonefish and Permit:

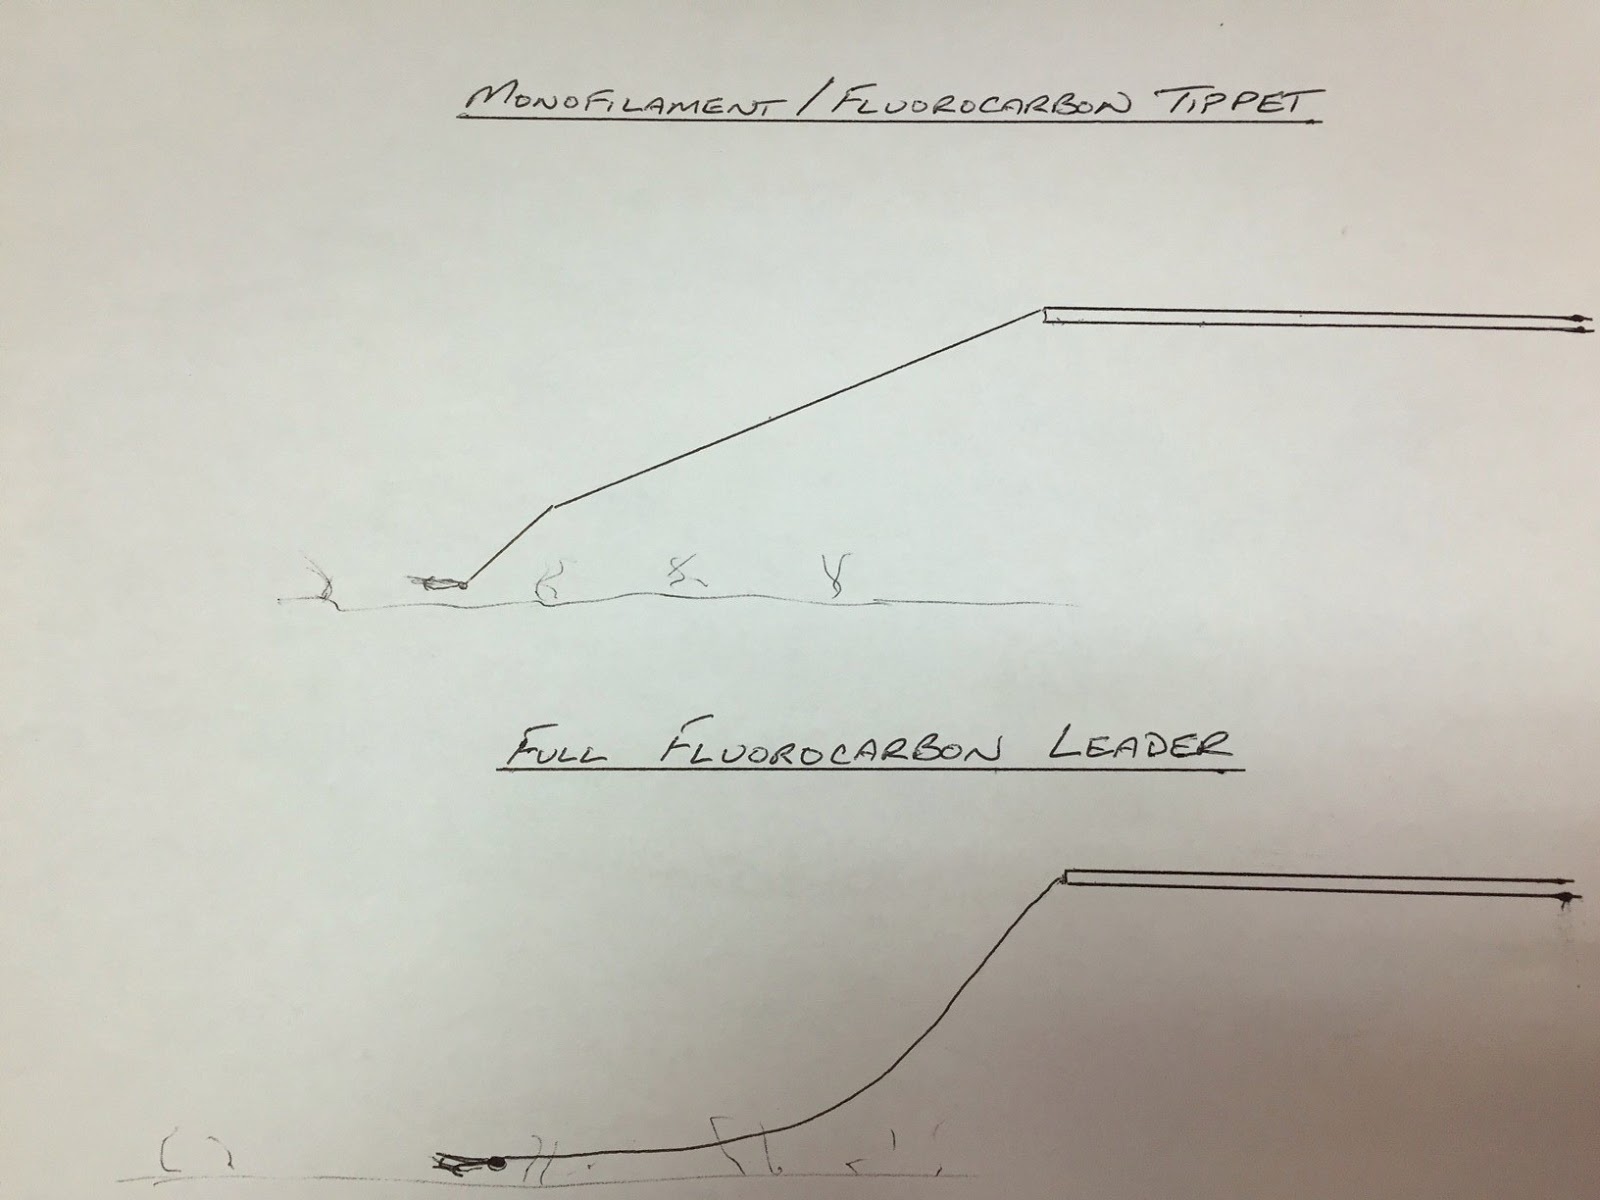
- Most of the leader manufacturers offer fluorocarbon saltwater leaders, for  Bonefish and Permit. You're best to stay away from the fluorocarbon leader. Why? Because one of the properties of fluoro is it's higher density. A fluorocarbon leader will sink horizontally, leading to the fly keeling on the bottom instead of "hopping" off the bottom on each strip. This will lead to numerous bottom and grass hookups, and snags, as well as a ton of spooked fish.

- Use a monofilament saltwater leader and replace the tippet (front 20-24") with fluorocarbon. This will fish the fly properly and give you the abrasion resistance at the tippet that you need.

The above drawing shows (top) how a mono leader/fluoro tippet will fish on the flat. The fly will pop off the bottom on strips. The bottom drawing shows how a full fluoro leader will sink. As the leader is horizontal on the bottom, the fly will drag, leading to spooked fish and snagged flies.

- Why should I use a saltwater leader? Why not freshwater stuff? The answer is simple, saltwater leaders have longer, stiffer butt sections and they are way easier to turn over in a flats environment.

- Should I make my own leaders? Certainly, most of us here at the shop build our own leaders for Bonefish and Permit. As long as you use clear, stiff, monos like Ande. If you're keen on building your own leaders, we have bulk spools of Ande Monofilament here at the shop and we can show you the proper tapers for either Bonefish or Permit.
 

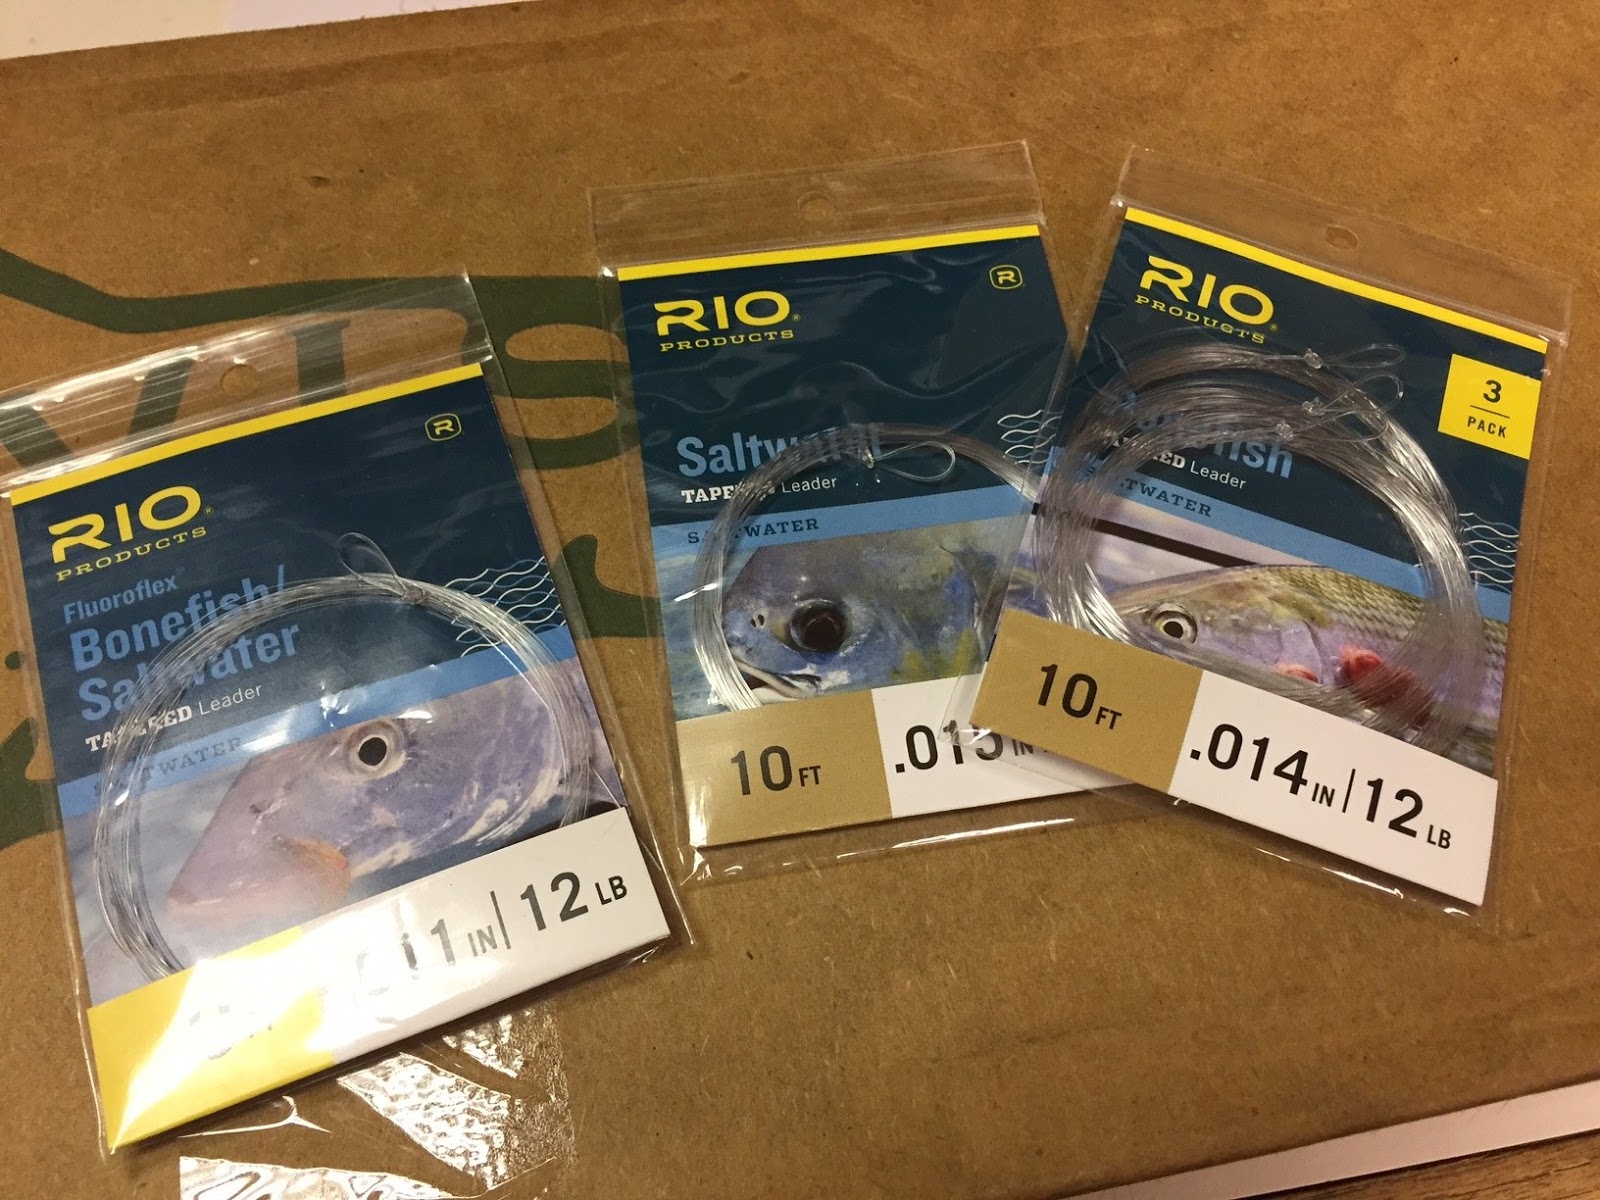
- What length of leader should I use? For Bonefish, 10-12 foot leaders will cover pretty much anything you might encounter Bonefishing. To make things simple, we recommend the 10 foot, 12 pound Bonefish leaders. As they are mono leaders, you just add about 20-24" of fluorocarbon tippet on the end and you have a perfect Bonefish leader.

For Permit, accuracy is paramount. This is why we always recommend to people heading off to go Permit fishing that they use nothing longer than 10 foot leaders. Anything longer and the denser, heavier Permit flies can be a real challenge to turn over. Nothing more frustrating than a 12 foot leader that you can't turn over on a 60 foot cast to the Permit shot of your dreams. 10 foot!
In our opinion, the best setup for Permit is a 10 foot, 16 pound saltwater leader (mono). Cut the front 24" off the leader and replace with 16 pound Flourocarbon. (12 or 14 pound tippet may be required in certain locations and situations).
 

- What knot should I use for tying leaders? Tippets? We always tell people to use the knot they are comfortable tying and have confidence in. Having said that, we tie all of our own leaders, from butt to tippet, with Blood Knots. Even the tricky mono to fluoro connection. Your blood knots should have at least five wraps each way on the blood knot for mono to mono. We do 5 wraps on the mono side and 6 wraps on the fluoro side for mono to fluoro connections.


Monday, August 11, 2014

Fly Boxes

There has been three customers in the last two days in the shop who lost a fly box with a LOT of flies inside.
Although it goes without saying it's best to hold on to your boxes and do up your zippers, you might want to write your name and phone number on your boxes in permanent marker. At least then you have the chance of a good samaritan saving you a bunch of money.

Thursday, December 13, 2012

Tips & Techniques-Washing Waders

Wader Care: Washing

Learn how you can extend the life of your Simms GORE-TEX® Waders and improve the performance over the life of the garment.


Monday, January 23, 2012

Fishing Tips

So, as you stand on a flat, you realize that perfect Permit pattern you tied in preparation for your trip just isn't quite heavy enough. The guide tells you that you need something heavier! Drats!
You know that this is the fly!


Don't give up on the fly. Next time you go on a trip, throw a half dozen black Tungsten beads in your fanny pack. If you run into this situation and want to stay with your awesome creation just thread one of the tungsten beads onto the leader and re-tie the fly on the leader.

Bead will rest up against loop knot.

Although not as efficient as the right size lead eyes, this will likely sink the fly to where you need so you can prove your theory as to you "perfect" creation!

As an additional note, if you're designing new patterns for Permit and Bonefish, and want to test how the fly rides and sinks in water, keep in mind that flies will sink considerably faster in fresh water than salt.
I know of situation where an angler has tied dozens of flies, only to find that , although they sunk well in the sink, they almost floated in salt water.

Thursday, September 15, 2011

Rod Storage In Boats

Had two seperate people contact me in the last week saying they lost rods. I nboth cases they were leaving the rods in the storage tubes in drift boats while towing the boat.

The rod storage systems in todays drif t boats are great, but under no circumstances should you leave your rods in the boats while towing the boat.

The likelihood of finding them if they come out is almost zero, and if you do find them they won't likely be in very good condition.


Monday, August 23, 2010

Mend Smarter, not Harder!

We've been having some very, very good foam fishing lately, but only if you're getting your fly in the zone, and more importantly, KEEPING it there! Big fish are lazy, and the longer your fly hangs in the zone, the better you're going to be.

Especially out of a drift boat, your mend is just as important (if not more-so) then your cast. You want to be mending the line all the way up to the bug, without pulling the fly out of the zone. This takes a lot of practice, but is pretty much a requirement to land the truly big fish on foam flies.

A couple tips (in essence, this is from a Drift-Boat point of view):

1. The line & leader closest to the fly is the stuff that matters! They'll be the quickest to pull out of the zone, and if you have these lined up immediately after your cast, you fly will sit a lot properly a lot longer. Mend the instant your fly lands. If you wait, you'll be too late.

2. You are allowed to mend more than once per cast. Typically you should throw your bug, do a big mend to line the leader and fly line closest to the fly upstream. Your next mend should work on the line closest to the rod tip, and align that with the fly.

3. More line, more problems. Don't add more line into your system when mending. The more line on the water, the more that can drag in the long run.

4. Master the reach mend, it will throw a mend in the cast before the line lands on the water setting you up for a great float. A reach mend can be achieved by casting as normal but when you have stopped your rod and your line is beginning to head to it's target, sweep your rod in the direction you would have mended to reposition the fly line without effecting where the fly lands. Trust me, this one takes some practice but is extremely valuable.

But how do I mend more efficiently you ask?? The most common mistakes we see are anglers that like to mend with the rod tip. A flick of the rod tip in a semi circle motion will rarely get the job done. Mending is a full body motion, well, almost. Use your arm to extend and lift the rod in an arcing motion, lifting as much line up and off of the water and repositioning where you want it. The key here is that too much and you can hank your fly off the bank or out of the "sweet spot" ie. mend smarter not harder.


Lazy trout like their bugs to hang around before committting.

Tuesday, August 10, 2010

FISHING REPORTS


Bow River Report –August 10, 2010

Trico fishing is getting into full swing. Last few days we’ve sen fish doing some pretty cool things while feeding on these bugs. You might want to try a low profile CDC Caddis pattern like the Bloom’s CDC Caddis or a Glo-Ant on these fish (a lot easier to see , and they eat it). Caddis continue to be around in good numbers and again, fish are eating them. Pseudos (little Blue-winged-Olives) are around in the afternoons, especially on the cloudy days. Oh, and there’s still fresh Stonefly shucks on a lot of banks!

Nymph fishing has been good, as usual. The standard techniques with a San Juan Worm or variation will produce a bunch of fish. Hopper-Dropper techniques using small to mid-sized bead head nymphs seem to work very well in somme places, not so hot in others (???). One of our guides pointed out his go-to bead head, the Chubby Cousin-Peacock the other day. Maureen fished it under a foam bug and lo and behold, it works like a darn!

Streamer fishing has been quite consistent and the water level is low enough that floating lines will cover almost everything.


Hatches: Caddis, Tricos, Stoneflies

Streamers: Party Boy, Silvey’s Sculpin Leech (Black w/ Olive, White Head), Marabou Clousers, Articulated Leech-Black or Purple

Nymphs: Hogan’s Chubby Cousin, Bloom’s Tung Dart, Gob-O-Worms, Chamois Leech, Tung Stud, TB super Pupa.

Dry Flies: PMD Sparkle Dun, Quill Body Parachute-PMD, Silvey’s Hatching Mayfly-PMD, Bloom’s Parachute Caddis, Bloom’s CDC Caddis, Berretts Barred Leg-Golden Stone, Neversink Stone Popper, Chubby Chernobyl.


Crowsnest River Report – August 10, 2010

Conditions are very good on the Crow right now. Zach was down a few days ago and came back with glowing reports of dry fly fishing with foam bugs.

Hatches: Yellow and Lime Sally Stoneflies, Caddis, Pale morning Duns, Quill Gordon mayflies, and Flav mayflies.

Streamers: Brunette Leech, Chamois Leech.

Nymphs: Pheasant-Tail, Hare's Ear, Copper John, Tung Stud, and San Juan Worm

Dries: Berrett’s Barred Leg Stone, Neversink Caddis, Fat Albert-Black, ParaTrooper-Green Drake, Spun Hair Dun-PMD, Berret’s Emerging Green Drake


High Country River Report – August 10, 2010

Fishing is good! With the exception the odd restart caused by rainstorms the high country streams are fishing very good. The Castle is fishing as good as it gets right now.


Hatches: Golden, Yellow and Lime Sally Stoneflies, Caddis, PMD’s, Quill Gordon Mayflies, Green Drakes, and Flav mayflies.

Streamers: Brunette Leech, Chamois Leech, Large, olive or white streamers for Bull Trout.

Nymphs: Pheasant-Tail, Hare's Ear, Copper John, Tung Stud, and San Juan Worm

Dries: Berrett’s Barred Leg Stone, Neversink Caddis, Fat Albert-Black, ParaTrooper-Green Drake, Spun Hair Dun-PMD, Berret’s Emerging Green Drake