
Every fisherman has their own special knot or combination of knots for their system but here's what I feel is one of the easiest combination (from reel to fly), to simplify and reduce the amount of time you spend fumbling around with mono-filament, fly line and backing.
Reel to Backing- Arbor knot

To tie the arbor knot, wrap the backing around the reel spool and tie an overhand knot around the standing line (labeled main line) then tie a second overhand knot on the tag end. Keep in mind that this is the least important knot of your entire system, it will only need to be done once (for the life of the backing which should coincide with the life of the reel) so don't spend alot of time practicing it.
Backing to Fly Line- Albright Knot
This may seem like a nasty little knot but keep in mind if your struggling a local fly shop will probably be more than happy to tie it for you. It, like the arbor knot, will not be tied regularly since it will only have to be done once per the life of your fly line.
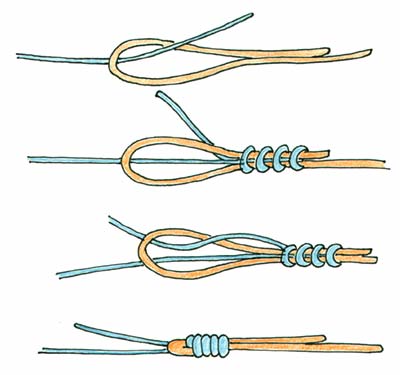
To begin, wrap the fly line around itself to create a loop and run the backing through the loop (image one.) Wrap the backing around the double strands of fly line backwards (towards the loop) approximately seven times (this diagram shows four wraps.) Now take the tag end of backing and place it through the loop of fly line (diagram three.) Now this is where a lot of people go wrong, there are two directions that the tag end of backing can go through the loop. The tag end must go out the same way it came in! For example in diagram three you can see that both ends of backing (in blue) end up on the same side of the fly line (yellow), if the backing was run through the loop in the opposite (wrong) direction then the two pieces of backing would end up on either side of the fly line. Once you have completed step three, all you have to do cinch up the knot so there isn't a lot of gap between the end of the wraps of backing and the end of the loop of fly line then pull gently on the tag end of backing, followed by pulling gently on the standing end of backing, alternate doing this until the knot is tight and secure. To finish, clip off the tag end of backing and the tag end of fly line.
Fly Line to Leader- Loop to Loop
Yes the loop to loop, for those that haven't heard it will reduce your knot tying time likely by half, no more nail knot! This knot is extremely simple, all you need is both the end of the fly line and the leader to have a loop. Both commonly come manufactured this way.

Take the fly line and pass it through the loop of the leader, now take the end of the leader and pass it through the loop of the fly line. Tighten up the knot and you have created a square looking, loop to loop knot. To reverse simply push the loops together to loosen then reverse the steps above.
Leader to tippet- Surgeons Knot

This knot is basically a double stranded overhand knot that is wrapped twice through the loop (not once.)
Overlap your leader and tippet material so you have a double strand, then make a simple overhand knot (image one.) Instead of tightening at this point, wrap the double strand through the loop once again (image two) and then tighten (image three.) Clip off the tag end of leader and the tag end of tippet.
Tippet to Fly- Clinch Knot

Thread the tippet through the eye of your hook, if you have trouble many gadgets called threaders exist that can help you do this. Wrap the tag end around the standing line six to eight times. Now you have made a loop back at the eye of the hook (image two), place the tag end through this loop and hold on to it. Pull on the standing line to tighten the knot, then clip off the tag. Important: do not pull on the tag end to tighten the knot, this will you give you a false knot. It will look right but will easily come undone producing a curly end commonly called a pigs tail when it does. If you see this pigs tail it is an immediate indication that you pulled on the tag end not the standing end.
Notes:
Terminology- Tag end refers to the end of material that is extra and has no purpose, it is usually clipped off. Remember not to clip it off as tightly as possible in order to give a bit of extra room for slipping.
Standing end refers to the end of material that is being used to connect.
***When dealing with materials such as mono-filament and fluorocarbon, they must be moistened before tightening. This is because as the knot is tightened it creates large amounts of heat that can weaken your perfectly tied knot. The easiest way, spit on it!
Hope this helps with your knot troubles, and if your still having trouble CP staff is more than happy to give you some instruction.
-C.
No comments:
Post a Comment